WordPress themes are playing the most important role in the creation of WordPress websites. WordPress releases each year some free themes in the name of that particular year which is totally free and we can find that on our theme panel as well as there are some paid themes that are also available which we can find as per our website type and requirement. That would be free or paid, but what if we don’t want to buy a new theme or we have a new idea and design in our mind to implement in our WordPress website, in that case, we have to create our custom theme in our website, we can be done this by HTML to converting WordPress theme.
How to start – To start working on a custom theme we have to choose one of the themes which are available in WordPress. Then we have to change the theme folder name to what we want to name our theme. But remember just by changing the folder name you can’t change the theme name from the admin panel for that you have to change the name of the theme in the style.css file, which you can find under the theme folder. When you open this file you can see there are some descriptions showing under the PHP comments like theme name, theme URL, author name, author Uri, version, description, etc. as same as you put in the plugin development. So, here is the place where the theme name you can change your custom name and in the author name you can put your own name or your company name, you can say by this you are informing WordPress that you are creating a new theme with some specific details.
Now go to your admin panel wp-admin->Appearance->Themes when you go to this location you can see that the theme you selected and change the name of the theme is visible with your changed name.
So, now you start the changes for creating your custom theme.
Linking important files- The main files of any WordPress theme are their CSS and js files, we can put those files header or footer but the most popular practice is to add the CSS files at header and js in the footer.
Before linking make sure you have added the CSS and js files into your CSS and js folder in your theme.
So, the process of linking is the same as we linked any kind of files we have to give the path of file means source location of the specific file, but in WordPress, we can’t give directly the path as we do in general we have to notify WordPress that we are linking files under the theme folder by an inbuilt function of WordPress, without that WordPress won’t consider that particular linked file. So, there are two main functions by which we are linked our file in the WordPress:
get_template_directory_uri()
get_template_url()
The above two functions are used for mainly to link the files in WordPress, how, I can give you an example for that :

As you can see in the above example the same way we used in the other method just change the specific function name.
Now we are done with our initial formalities for creating our custom theme. At this point, if we write some HTML with the classes which are already in our linked CSS files then the HTML body will definitely react as per the CSS code in the linked file.
Don’t forget to check that wp_head() and wp_footer() these both functions should not be removed from the header and footer file, because by using these two WordPress loads some important files which are required for the proper functioning of the website.
Implementing HTML- As we are aware that we are converting the HTML to a WordPress theme for creating our custom theme, so after including the important files you have to put your HTML in your theme. As we all know very well that we got the HTML page with the .html extension and in that file, we can easily see the header part under the <header> tag. We have firstly just copied and pasted the HTML of the header part in our WordPress theme header.php’s <header> tag same thing is applicable for the footer part. Put the footer HTML in the footer.php under the <footer> tag.
Testing by a page- After linking the CSS and js files and adding the header and footer you have to check first how it will load on the web page for that you have to create a template and call your header and footer over there by the WordPress inbuilt functions for calling the header and footer. For that, you need to create a template file and give a name.
For this, you can create a file into your theme directory with the .php extension and in the file, you have to write template name in the PHP comments like this:
<?php

    /*

    * Template Name: Custom Page Template

   */

  ?>
That’s it your testing template page is created. Now you go to your admin panel and add a new page from wp-admin->Pages->Add New here.
Give a name and publish your page. Now you can see the very right of your screen there is a section named page attributes and in that section, you see another sub-section named “Template” with drop down, when you click on that drop-down you can see your recently created template are listed there. You can select and update your page.
Now the template PHP file which you created is linked with this template whatever you call on your template PHP file or whatever you write over there you can see on this page at the front end.
Here you have to call the header and footer with their respective function.
For calling header, you have to call get_header() function and footer by the get_footer() function there is no need to call any kind of inclusion function apart from these two.
When you call these functions you can see your header and footer are displaying as like the visible in your HTML file.
Now your main work regarding the custom theme is done now how much as you want you can create templates by using the same header and footer function. For managing the blocks you can create the custom post type if needed, you can refer to my custom post type blog for that.
Benefits of using Custom WP Theme- There are a number of benefits of creating our own custom theme, some of the benefits are easily understandable by the process of creation of custom theme as I described above.
- Using custom themes provides us with freedom about changes in designs and most of the functionality in our website we can modify the theme design as we want.
- We can modify and mold our theme by creating the custom widgets , custom templates and custom posts.
- By changing or adding the new css files we can change the UI of our wordpress website.
Child Themes- So, now we understand how we can create custom themes and some of their benefits, now we go to the child themes. So, as we understand by name, a child theme is something that has some parent theme. So, as per WordPress, a child theme is that theme that has all the look and feel of the parent theme and all of its functions but can be used to modify any part of the theme.
Why do we need Child Themes- Suppose we want to modify our WordPress theme but we want that actual functionality or actual look and feel also remain the same, so for the modification on that particular theme without affecting the main files we create the child themes.
Child Themes Basic Nature- Child themes use all the needed templates from the parent theme, doesn’t matter that we call under the child theme folder or not. How to create a folder for a child theme I will discuss in further discussions. But if we override a particular template and take on the child theme the WordPress first takes that active child theme template which comes under the rule of template hierarchy.
How to create Child Themes- The process of creating a child theme is very easy, we only need a minimum of two files for creating the child themes one is functions.php and the other one is style.css. In the functions.php only we have to do is include or enqueue the style.css and in the style.css we don’t need to write any kind of CSS code or any other things we just have to put some information same as like we have put when we are creating our custom theme. I can give you the minimum required code of child theme style.css of twenty-twenty-one’s child theme. Here it is:
/*

 Theme Name:   Twenty Twenty-One-Child

 description:  A child theme of the Twenty Twenty default WordPress theme

 Author:   Nick Schäferhoff

 Template: twentytwentyone

 Version:  1.0.0

*/
In the above code, you can clearly see that we just need very little or little information for creating the child theme. The CSS needed for managing the theme can be taken by the parent theme, so we don’t have to worry about it. Now we have to add our child theme’s functions.php which is the main file of our theme because it only includes the CSS of your theme. So, the method of inclusion of CSS files in functions.php is an ordinary method of WordPress to include the styles by using the wp_enqueue_style function. The code for this is :
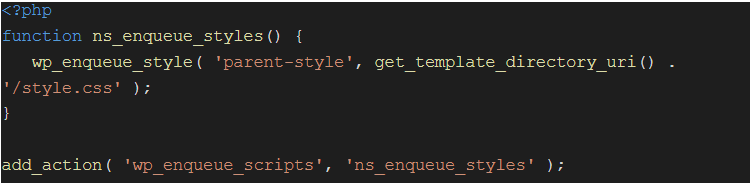
And that’s it guys we are done with our creation of a child theme. We can see our newly created child theme in our WordPress admin panel on wp-admin->Appearance-> Themes this location with the name of the child prefix.
Template Hierarchy- So, till now we understand most of the things about custom theme creation and child themes but without this one topic our knowledge of custom theme or WordPress themes is always incomplete and the topic is Template Hierarchy. So, by the name, we can understand its hierarchy of templates.
Basically how the template hierarchy is used or works we can understand by an example suppose we are called some template in our custom child theme and the WordPress don’t find that template there then it goes and search its parent theme and search that specific template which is called, and if it also not found therein that condition WordPress loads the index template.
So, it works on a hierarchy basis that’s why the bunch of these templates combinedly are called Template Hierarchy.
We can understand template hierarchy with the basic example of the home page: by default when you install WordPress it loads your latest blog page as your front page or homepage of your website which is followed by the index.php template file that’s why it’s also called the index page. But when you would create a separate template for your home page and already call it in any static page of WordPress and set that page as a front-page from settings->reading Homepage section, here you can opt for the static page rather than your latest posts then you can assign the pages for your front page or homepage and your blog posts page, and this condition WordPress loads your selected page for the home page but, suppose your called template file does not exist then it will redirect to or called the index.php the default page template file of WordPress, like at the starting when you install WordPress your latest blog post page is displaying your front page the template name for index or blog page is called the index.php.
By the above example, we understand if we assign some page to a specific template WordPress first called that one, and if it was not found in your theme directory then it follows its basic nature and called that file which is called when default WordPress is installed like if it is front-page it goes on index.php or your posts page and if it’s normal kind of page it loads page.php.
So, this whole process of searching and calling the template files according to the specific rules is called the template hierarchy.
Sidebars- When we talk about WordPress custom theme development or any kind of WordPress theme sidebars are playing the most important role in theme development.
Sidebar helps us to add a sticker in our website which we can add anywhere or if we want to display on all pages so we have to call that widget into the respective template part files or template files. For creating a widget we are called an inbuilt function of WordPress called register_sidebar and we have to pass the parameter in it in the active theme’s functions.php like this:
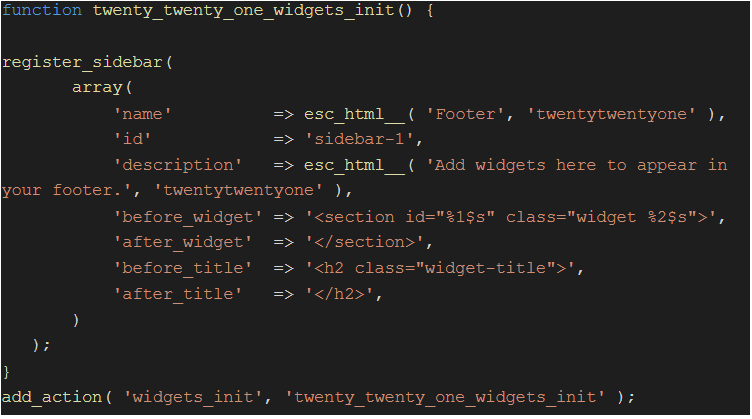
In the above code, we can see how we can create the WordPress sidebar. In the WordPress sidebar we can add the widgets most popular and inbuilt widgets we can see on the left side when we visit the widget section on the admin panel.
wp-admin->Appearance->Widgets For calling the sidebar we are using another inbuilt function of WordPress which is dynamic_sidebar(). We have to pass the sidebar id into the function and we can call in any template anywhere in the WordPress files. For the above example the sidebar calling code should be like this:
<?php dynamic_sidebar(‘sidebar-1’); ?>That’s it, we are done.
And when we create the custom templates we put the HTML in between the get_header() and get_footer() functions, we have also made that dynamic so the user can manage it by the admin panel and make changes.
Making Dynamic Template- Once we are done with the basic structure of the WordPress template we can put our HTML if we are converting the static HTML part to the dynamic. We are calling the header.php by the function get_header() and footer.php Byu get_footer(). In the header.php we have to make our static HTML
menu dynamic so that we can manage that by the admin panel wp-admin->Appearance->Menus.
So, we can use the already created menus of WordPress, or we can create our new ones by using the function register_nav_menus().
For example:
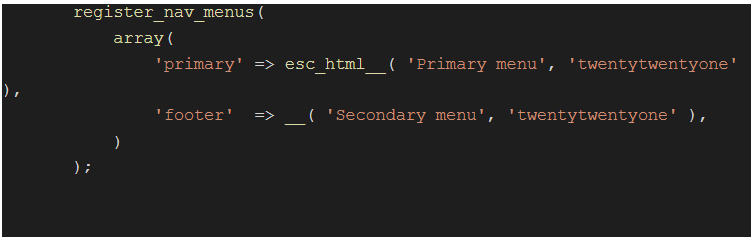
As above you can add multiple menus like primary and footer are shown above.
Then in the menus section in the admin panel wp-admin->Appearance->Menus you have to click on the create new menu link give some name on the menu name for here we take the Primary menu and click on the blue button named Create Menu. On the same screen, you can see the menu names with the checkboxes and that name is also mentioned there which you have recently created, Primary Menu and Secondary Menu. You have to choose which menu you want to call on which menus, so wherever you call that particular menu that admin-generated menu will display automatically. In the admin, you just have to select the pages from the list of existing created pages on the left-hand side of the screen by selecting the checkboxes and clicking on the Add to Menu button.
You can change the order of the pages by dragging and dropping the menu items.
Now it’s time to call the menu on the template generally we call the header menu in the header.php and if we have the footer menu then we call it on the footer.php the way of calling in both of the conditions are the same we have to use the wp_nav_menu() function. We have to pass the parameters in the function as we do other functions. Here is an example of usage of the wp_nav_menu function :
wp_nav_menu( array( ‘theme_location’ => ‘extra-menu’, ‘container_class’ => ‘my_extra_menu_class’ ) );
So, by using the above function you can call the menu the parameter named ‘theme_location” is that parameter where you have to call that menu name which you created by using the register_nav_menu().
So, by this method, you can make your HTML menu to WordPress dynamic menu and you can manage your menu from the backend by drag and drop method.
The same thing applied to the footer menu and any other kind of menus.
Adding CSS and JS files- When we start our theme development we saw that how can we link the files but what if we have to enqueue or call our style or js file in between any template code or our theme’s functions.php or in between creating any kind of plugin we have to enqueue the CSS and js scripts for that. For this WordPress provides the functions for enqueueing the files :
- For js and jQuery wp_enqueue_script().
- For css wp_enqueue_style().
Use of both functions we can understand by the following example:
add_action( ‘wp_enqueue_scripts’, ‘my_plugin_assets’ );

function my_plugin_assets() {

    wp_register_style( ‘custom-gallery’, plugins_url( ‘/css/gallery.css’ , __FILE__ ) );

    wp_register_script( ‘custom-gallery’, plugins_url( ‘/js/gallery.js’ , __FILE__ ) );

    wp_enqueue_style( ‘custom-gallery’ );

    wp_enqueue_script( ‘custom-gallery’ );

}
In the above example, you can easily understand how can we define or register our script we have to choose a name for our script the name can be anything that doesn’t matter, and after you have to give the path of that particular file these two are the important parameter of the wp_register_script() and wp_register_style() function.
So, till now we cover most of the things which we should be aware of when we are creating the custom WordPress theme.