
Unit testing is a level of software testing where individual units/components of a software are tested. In the React world this means testing an individual React Component or pure functions.
Why should I test ?
Unit testing in particular is possibly the most important part of testing. The best scenario about testing is that for example if i am a developer and writing a component and due to some reason another developer starts working on this , then the test suite which i have written for this will fail so this will show that another person is working on this .
- They are very fast to run allowing us to very quickly understand if there is anything broken in our app.
- They bring great value with the least amount of effort as they are very easy to write compared to other more complicated tests.
- If they fail it is very easy to know where the error is because they only concentrate on small units of code.
Requirements for React unit testing
In order to do our unit testing we will use two very popular libraries
- Jest
- Enzyme
Introducing Jest
The first tool we will visit is Jest . Jest is a node-based test runner allowing fast parallel running of tests in a node environment. written by facebook and has become very popular in the past few years (You could also use other libraries such as mocha or chai).
Introducing Enzyme
enzyme will help us render React components in testing mode. You will see both in action in the following sections.
Installation And configuration
- you can install Jest with npm or yarn:
yarn add --dev jest
#or
npm install --save-dev jest
2 . Install Enzyme:
npm install --save-dev enzyme enzyme-adapter-react-16 enzyme-to-json3 . Create a src/setupTests.js file to customize the Jest environment:
import Enzyme from 'enzyme';
import Adapter from 'enzyme-adapter-react-16';

// Configure Enzyme with React 16 adapter
Enzyme.configure({ adapter: new Adapter() });

// If you're using the fetch API
import fetch from 'node-fetch';
global.fetch = fetch;
4 . In order to run jest with npm test , then update your package.json like this:
{
  "dependencies": {
    "react": "16.8.3",
    "react-dom": "16.8.3"
  },
  "devDependencies": {
    "enzyme": "3.9.0",
    "enzyme-adapter-react-16": "1.11.2",
    "jest": "24.6.0",
    "node-fetch": "2.6.0",
    "react-test-renderer": "16.8.6"
  },
  "scripts": {
    "test": "jest",
    "test:watch": "jest --watch",
    "test:coverage": "jest --coverage"
  },
 "jest": {
    "setupFilesAfterEnv": ["<rootDir>/src/setupTests.js"]
  }
}
5. Now create a jest.config.js file inside root directory and follow the link mentioned below :
Please find the sample of jest config file mentioned below :
module.exports = {
 verbose: true,
 collectCoverageFrom: [
      'src/**/*.{js,jsx}',   ],
 setupTestFrameworkScriptFile: "./enzyme.js",
 roots: [ "../__tests__" ], modulePaths: [ "./__stubs__" ],
coveragePathIgnorePatterns: [
      'src/apollo-client',
    ],
 moduleFileExtensions: [
      'web.js',
      'Js',
     etc...
    ],
 testPathIgnorePatterns: [
      '/node_modules/',
       etc...
      ],
 moduleNameMapper: { ".scss$": "scss-stub.js" }
}
6 . how to run the test file ?
// Single run
$ npm run test

// Watchmode for the coverage
$ npm run test:c
Type of Unit test cases
- Snapshot testing in Jest
Snapshots are ideal for testing things that you don’t expect to change or don’t want to change in the future. We’ll use them to test components, actions and reducers and ensure they only change when we want them too.
And the advantage of this testing is it will increase your coverage percentage and also when something changes in the code structure then it will break the snapshot so that you come to know that there are some changes in the code .
How to test with snapshots
Step 1. Write a test for the component and in the expect block, use .toMatchSnapshot() method that creates Snapshot itself.
it('renders correctly enzyme', () => {
  const wrapper = shallow(<Basic />)

  expect(toJson(wrapper)).toMatchSnapshot(); });
Step 2. When you run the test for the first time on the one level, along with the test, there will be a created directory named __snapshots__ with the autogenerated file inside with the extension.snap.
Step 3. Push snapshot into the repository and store it along with the test.
If a component has been changed, you need just update the snapshot with —updateSnapshot flag or using shot form u flag.
2. Testing in Jest and Enzyme
Asynchronous testing have the following parameters mentioned below :
Mount
- Full DOM rendering including child components
- Ideal for use cases where you have components that may interact with DOM API, or use React lifecycle methods in order to fully test the component
- As it actually mounts the component in the DOM .unmount() should be called after each tests to stop tests affecting each other
- Allows access to both props directly passed into the root component (including default props) and props passed into child components
- With the help of the Mount we can do the innermost nested component rendering example (hoc )
- If we are using mount then .childAt() will be used in that case for rendering the innermost HOC
Shallow
- Renders only the single component, not including its children. This is useful to isolate the component for pure unit testing. It protects against changes or bugs in a child component altering the behaviour or output of the component under test
- As of Enzyme 3 shallow components do have access to lifecycle methods by default
- Cannot access props passed into the root component (therefore also not default props), but can those passed into child components, and can test the effect of props passed into the root component. This is as with shallow(<MyComponent />), you’re testing what MyComponent renders – not the element you passed into shallow
- When we are using shallow then we have to use .dive() in that case.
Render
- Renders to static HTML, including children
- Does not have access to React lifecycle methods
- Less costly than mount but provides less functionality
Start Using Jest
Jest discovers test files within your project via their filenames, of which can be located at any depth of your project. There are 2 naming conventions we can adopt in order for Jest to pick up our tests:
- Any file with a .test.js suffix or a .spec.js suffix. This may be preferable when a component (e.g. App.js) can be accompanied by an App.test.js file in the same directory,
where they will reside next to each other. This optimises discoverability and keeps import statements to a minimum.
- Any .js file within __tests__ folders throughout your project. If you have multiple test files to test a particular component or component directory, a __tests__ folder allows a more coherent structure whereby your tests and components are not mixed. This may be preferable in larger projects.
Which method you adopt is your call and will depend on your project.
Now let’s write a simple test to examine Jest syntax. Let’s add an App.test.js file within the same directory as App.js. This test will have no relation to App.js just yet, but instead will introduce some key methods of Jest; describe() and it(), as well as the expect() methods:
// App.test.js
describe('Examining the syntax of Jest tests', () => {
it('sums numbers', () => {
 expect(1 + 2).toEqual(3);
 expect(2 + 2).toEqual(4);
  }); });
Let’s break down the above example to understand this syntax:
- describe(): An optional method to wrap a group of tests with. describe() allows us to write some text that explains the nature of the group of tests conducted within it. As you can see in the Terminal, the describe() text acts as a header before the test results are shown.
- it(): Similar in nature to describe(), it() allows us to write some text describing what a test should successfully achieve. You may see that the test() method is used instead of it() throughout the Jest documentation, and vice-versa in the Create React App documentation. Both are valid methods.
- expect() and .toEqual(): Here we carry out the test itself. The expect() method carries a result of a function, and toEqual(), in this case, carries a value that expect() should match.
Testing Terminology
At this point it is worth going over the main terminology we encounter with React testing — let’s go over some commonly used terms:
Unit test: Testing one isolated function, or one React component. Enzyme’s shallow() is a unit test.
Integration test: Testing a multitude of functions working together, or an entire React component including children components. Enzyme’s mount() is an integration test.
Mock function: Redefining a function specifically for a test to generate a result. E.g. returning hard-coded data instead of relying on fetch requests or database calls. This strategy could prevent the hard-coded sum issue we were discussing earlier!
Mock functions can be defined in jest with jest.fn(() => { //function here });.
Main instructions for component testing
1. One component should have only one snapshot. If one snapshot fails, most likely the others will fail too, so do not create and store a bunch of unnecessary snapshots clogging the space and confusing developers who will read your tests after you. Of course, there are exceptions when you need to test the behavior of a component in two states;
2. Testing props: As a rule, I divide the testing of the props into two tests: — Firstly, check the render of default prop values; when the component is rendered, I expect a value to be equal from defaultPropsin case this prop has defaultProps. – Secondly, check the custom value of the prop; I set my own value and expect it to be received after the render of the component.
3. Testing data types: In order to test what type of data comes in the props or what kind of data is obtained after certain actions, I just ensure the proptypes are correct. Data type is a very important programming part and shouldn’t be skipped.
4. Event testing: After creating a snapshot and covering props with tests, you can be sure in correct rendering of the component, but this is not enough for full coverage in case you have events in the component. You can check event in several ways; the most widely used are:
- mock event => simulate it => expect event was called
- mock event => simulate event with params => expect event was called with passed params
- pass necessary props => render component => simulate event => expect a certain behavior on called event
5. Testing conditions: Very often you can have conditions for the output of a particular class, rendering a certain section of the code, transferring the required props, and so on. Do not forget about this because with default values, only one branch will pass the test, while the second one will remain untested. In complex components with calculations and lots of conditions, you can miss some branches. To make sure all parts of the code are covered by tests, use test coverage tool and visually check which branches are covered and which are not.
6. States’ testing: To check state, in most cases, it is necessary to write two tests:
- The first one checks the current state.
- The second one checks state after calling the event. Render component => call function directly in the test => check how state has changed. To call a function of the component, you need to get an instance of the component and only then call its methods .
After you walk through this list of instructions, your component will be covered from 90 to 100%. I leave 10% for special cases that were not described in the article, but can occur in the code.
Examples of Testing
Let’s move to examples and cover components with tests under described structure step by step.
1. Testing of a component button.js
Take one component from the component directory; let it be button.js
const AddButton = (props) => {
const { children, classes, handleClick } = props;
  return (
<div>
<Button className={classes.addBtn} id="add" onClick={handleClick} {...props}> {children} </Button>
 </div> );};
export default withStyles(style)(AddButton);
1.Create snapshot first:
it('render correctly date component', () => {
const buttonWrapper=shallow(<AddButtom />).dive();
2.Testing props:
expect(buttonWrapper.prop(‘children’)).toBe(‘addbtn’);
Test null prop value; this check is required to ensure the component is rendered without defined value:
expect(buttonWrapper.prop('children')).toBe('addbtn');

Test null prop value; this check is required to ensure the component is rendered without defined value:


it('render button correctly with null value', () => {
   const props = {
           children: null
       },
       buttonWrapper= shallow(<AddButton {...props} />);
   expect((buttonWrapper).prop('children')).toEqual(null);
});
3.Test proptypes for value, expected to be string:
it('render button input correctly with value', () => {
 const props = {
           children: 'addbtn',
       },
 buttonWrapper= shallow(<AddButton {...props} />); expect((buttonWrapper).prop('children')).toEqual('addbtn');
});
4.Test events:
Check the onClick event, for that mock onClick callback => render button component => then simulate click event with new target value => and finally check that onClick event have been called with new value.
it('check the onClick callback', () => {
   const props = {
           children: 'addbtn',
         onClick: () => { },
       },
 buttonWrapper= shallow(<AddButton {...props} />);
const addbtn = wrapper.find('#add');
expect(addbtn.length).toBe(1);
addbtn.simulate('click' });
expect(onClick).toHaveBeenCalledWith('button');});
Note : There are two scenarios for finding the instance of a component
- If we are using the class component then we can find the instance()
- If we are using the functional component then in that case we will not find the instance() of a component then in that case we use a debug() function
Note : Writing the test case of the Class component in quite easy then Functional component because there we didn’t find the instance()
In the next step we did a Snapshot testing which i mentioned above very clearly
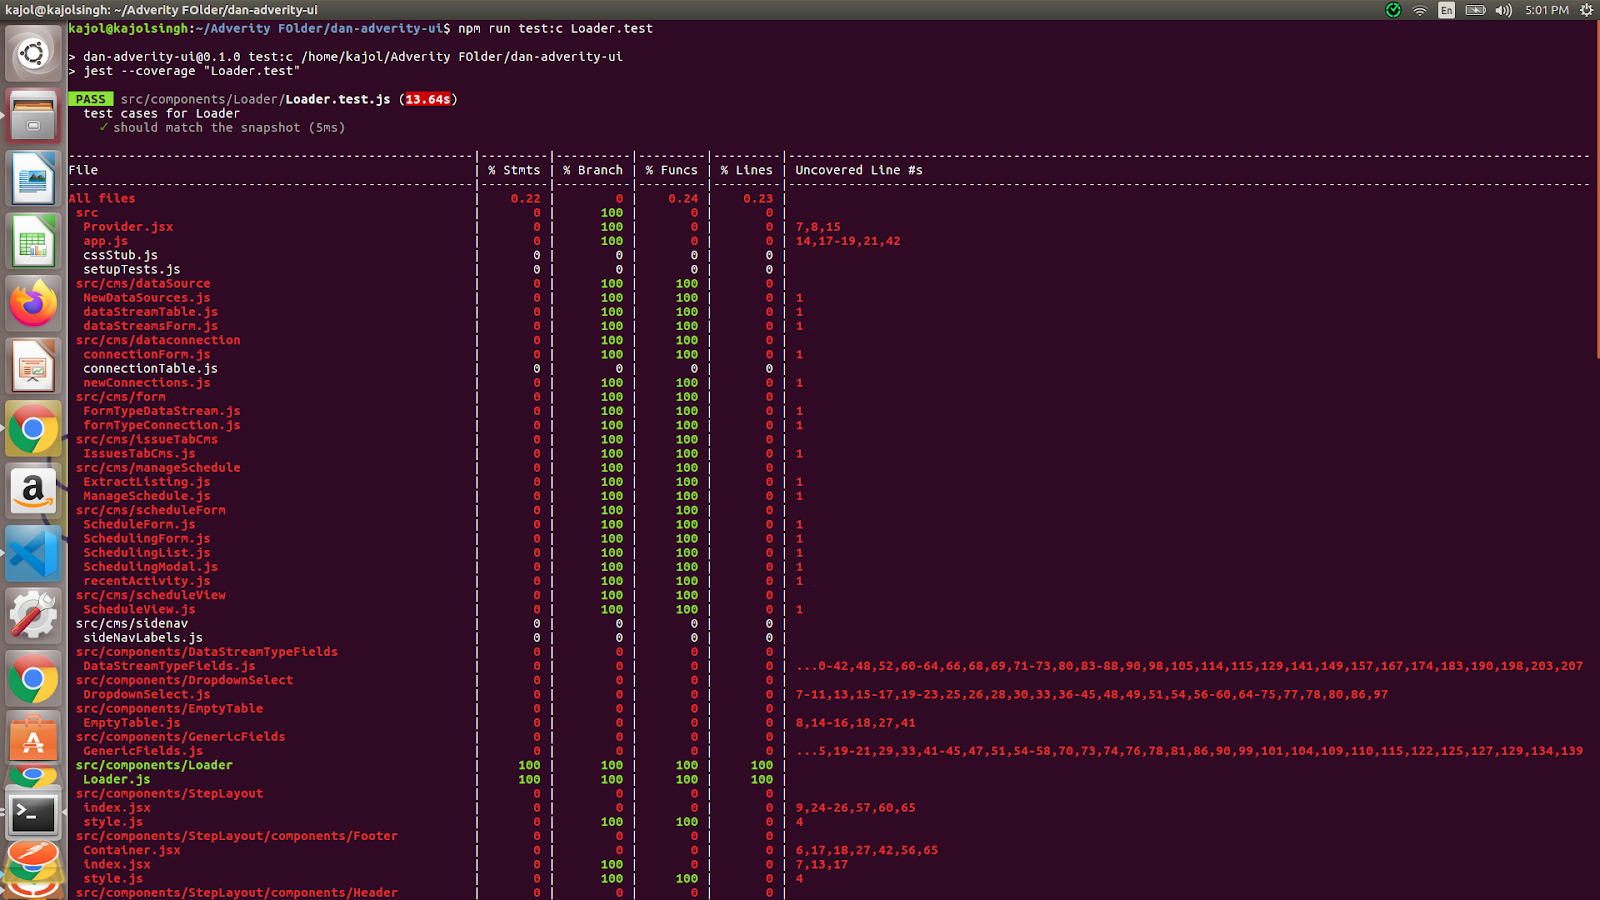
Now have a look on the coverage part
1. Testing of a component with HOC and graphql query
Unit test case of graph ql query scheduleList.test.js
class ScheduleList extends Component {
  constructor(props) {
super(props);
 this.state = {  }
}
 render() {
const { datastream_id, cmsContent, schedulesString = '  ' } = this.props;
 return (
 <Query fetchPolicy="network-only" query={GET_DATASTREAM} variables={{ dataStreamId: datastream_id }}>
{({    error, loading, data  }) => {
  let datastreamList = {};
  let requiredFields = {};
  if (loading) {


 return <Loader />;    }
   if (error) {
  return 'Error while loading data';
   }   if (data) {
 const { getDataStreamById } = data;
 datastreamList = getDataStreamById.data.schedule;
  requiredFields = {
  interval: schedulesString,
  lookback: `${datastreamList.lookback_window}     ${datastreamList.lookback_type}` }  }
const scheduleView = cmsContent.ScheduleView;
return (  <>
{
   Object.keys(requiredFields).map(key => (
  <Stack mb={1}>
<Box pr={5} width={[2 / 3]}>
<Paragraph>{scheduleView[key]}</Paragraph>
   </Box>


  <Box pr={5} width={[2 / 3]}>
 <Paragraph>{requiredFields[key]}</Paragraph>
       </Box>
  </Stack>))} </>   ) }} </Query>
   )}}
ScheduleList.propTypes = {
  cmsContent: PropTypes.object.isRequired,
datastream_id: PropTypes.string.isRequired,
schedulesString: PropTypes.string.isRequired,
}
export default withCMS(ScheduleViewCms)(withApollo(ScheduleList));
scheduleList.test.js
import { MockedProvider } from '@apollo/react-testing';
import Adapter from 'enzyme-adapter-react-16';
import ApolloClient from 'apollo-boost';
import { ApolloProvider } from 'react-apollo';
import { CmsContext } from '@dentsu/platform-shell';
import { SchedulingForm } from '../SchedulingForm';
import { GET_DATASTREAM_SCHEDULE } from '../graphql/Query';
configure({ adapter: new Adapter() });
let wrapper
const client = new ApolloClient({  uri: 'http://localhost:5000/graphql'});
const val = [];
const mocks = [{
 request: {
  query: GET_DATASTREAM_SCHEDULE,
  variables: {
    dataStreamId: '534734773476'
      }}
     result: {
 data: {
  getDataStreamSchedule: {
  data: {
  id: '23',
name: 'Test',
 next_run: 'Tomorrow',
last_fetch: 'Yesterday',
 enabled: false,
schedule: {
 id: '123',
 cron_preset: 'Daily',
 cron_start_of_day: '08/12/2019',
cron_interval_start: '30 min',
time_range_preset_label: '30 mins',
time_range_preset: '1 hours',
fixed_start: 'Today’,
  fixed_end: 'Tomorrow'   }  }}  } }];
const value = {
 data: {
  getContent: {
  result: {}} },
  loading: true };
describe('test cases for SchedulingForm', () => {
 const props = {
 size: 10,
 className: '',
  match: {
params: {
  id: '13236357637'   } },
cmsContent: {
    dst_heading: 'Data Sources,  },
  timeRangeCheck: true,
client: {
 mutate: async () => { }    }  };

  beforeAll(() => {
wrapper = mount(
 <ApolloProvider client={client}>
   <CmsContext.Provider value={value}>
   <MockedProvider addTypename={false} mock={mocks}>
 <SchedulingForm {...props} />
  </MockedProvider>
</CmsContext.Provider>
    </ApolloProvider> ).childAt(0).childAt(0)  .childAt(0)  .childAt(0) .childAt(0) });
it('should match the snapshot', () => {
 expect(wrapper).toMatchSnapshot()} });
  it('SchedulingForm function handleDialogue ', () => {wrapper.instance().handleDialogue(val)
});
    it('SchedulingForm handleDateChange function', () => {
 const type = 'start',
 const date = new Date('2020-03-27');
wrapper.instance().handleDateChange(date, type)
 });
it('SchedulingForm handleDeleteSchedule function', () => { wrapper.instance().handleDeleteSchedule(val, val)  });

 it('Simulate mutation onchange', async () =>
   const fn = wrapper
 .find('DialogBox')
 .at(0)
    .prop('onChange');
  expect(fn).toBeInstanceOf(Function);
       });
Followings are the guidelines
- As we have a query then our first step is to make a mokeData of the query
- As we are wrapping in apollo then we have to create an instance of a client
- Now define all the props which are used in the component
- Now we can wrap the component in the HOC as we can see in the component there are Cms content and withApollo and also we have mock data so we can also wrap it inside mock provider
- We have applied childAt(0) because we are using mount not shallow
- After that we start with the Snapshot testing
- Now we have to test the functionality so we can use instance of the component to test the following component
- For handlechange or handleclick function we create a simulate method for the fake click to test the functionality
Reference Links :
- https://jestjs.io/docs/en/tutorial-react
- https://pusher.com/tutorials/react-jest-enzyme
- https://medium.com/codeclan/testing-react-with-jest-and-enzyme-20505fec4675