Newly open-sourced React framework

Remix is a full stack web framework that lets you focus on the user interface and work back through web fundamentals to deliver a fast, slick, and resilient user experience.
Introduction
Nowadays, it seems like there’s a React framework being introduced every day. And while every React framework has something special to offer, Remix stands out. Though it isn’t new, it recently became open source after initially being available on a paid subscription basis.
Remix is a React framework used for server-side rendering (SSR). This means that both the backend and the frontend can be made using a single Remix app. Data is rendered on the server and served to the client side with minimum JavaScript. Unlike vanilla React, where data is fetched on the frontend and then rendered on the screen, Remix fetches data on the backend and serves the HTML directly to the user.
In this article, we will discuss some cool things about Remix, then move on to create an SSR weather app using this new framework.
Benefits of using Remix
Remix, just like other frameworks, has some special built-in features that make it convenient for developers. Here are some of my favorites:
Nested pages
Any page inside a route folder is nested in the route instead of being separate. This means you can embed these components into your parent page, which also means less loading time.
Another advantage of doing this is that we can enforce error boundaries to these embedded pages, which will help with error handling.
Error boundaries
Suppose you get an error in a Remix component or a nested route; the errors are limited to the component and the component will fail to render, or it will simply show an error. In other frameworks, it will break the entire page, and you will see a huge error screen.
While error boundaries can be implemented in Next.js as well, Remix has this built in, and I think it’s a cool feature for production builds so that the user doesn’t get locked out of the entire page for a simple error.
Transitions
Remix automatically handles all loading states for you; all you have to do is tell Remix what to show when the app is loading. In other frameworks like Next.js, you need to set the loading state using some state management library like Redux or Recoil. While there are libraries that can help you do the exact same thing in other frameworks, Remix has this built in.
Traditional forms
Now we are going back to when developers used PHP. We used to specify a form method and action with a valid PHP URL; we use a similar approach in Remix.
I know this doesn’t sound fun because we are used to onClick, onSubmit, and HTTP calls. But Remix handles this situation in a completely different way by providing functions like action and loader to perform server-side operations. Form data is easily available in these functions. This means there’s absolutely no need to serve JavaScript to the frontend to submit a form.
Suppose you have a fairly simple website and you don’t really need to serve JavaScript to the frontend. This traditional form method works the best in these situations. In other frameworks, you might need to serve JavaScript to make a fetch or an axios call, but you don’t need to do that in Remix. It helps keep things simple.
Drawbacks of using Remix
- Routing system might be confusing
- Smaller community
What makes Remix different from Next.js?
Remix and Next.js because both of them support SSR. However, while Next.js supports SSG and other awesome tools, Remix only focuses on SSR.
Prerequisites
If you want to follow this tutorial locally on your own computer, it is important for you to have these things installed:
Creating a Remix app
Navigate to a safe directory and use the following command in the terminal to initialize the installation of our Remix app:
npx create-remix@latest
Of course, you can replace app-name with whatever project name is suitable for you. Once you hit Enter, you will see an interactive menu that will help you make a Remix app.

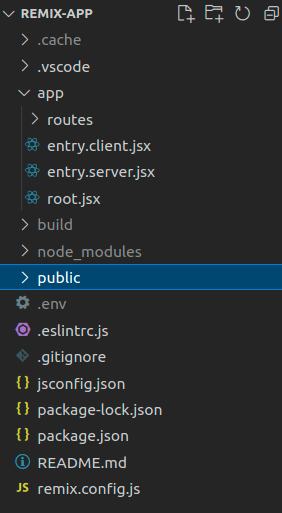
Project Structure
Let’s talk briefly about a few of these files:
- app/ – This is where all your Remix app code goes
- app/entry.client.tsx – This is the first bit of your JavaScript that will run when the app loads in the browser. We use this file to hydrate our React components.
- app/entry.server.tsx – This is the first bit of your JavaScript that will run when a request hits your server. Remix handles loading all the necessary data and you’re responsible for sending back the response. We’ll use this file to render our React app to a string/stream and send that as our response to the client.
- app/root.tsx – This is where we put the root component for our application. You render the <html> element here.
- app/routes/ – This is where all your “route modules” will go. Remix uses the files in this directory to create the URL routes for your app based on the name of the files.
- public/ – This is where your static assets go (images/fonts/etc)
- remix.config.js – Remix has a handful of configuration options you can set in this file.
Go ahead and run the build:
npm run build
That should output something like this:
Building Remix app in production mode…
Built in 132ms
Now you should also have a
- .cache/ directory (something used internally by Remix)
- build/ directory, and a
- public/build directory.
The build/ directory is our server-side code. The public/build/ holds all our client-side code. These three directories are listed in your .gitignore file so you don’t commit the generated files to source control.
Let’s run the built app now:
npm start
This will start the server and output this:
Remix App Server started at http://localhost:3000
References:-