Afterlogin to the admin panel you can see the post, pages in the left hand side of your admin panel, so post , pages are the two of the default post types are in wordpress, there are other default post types which are wordpress provides us is : Attachment, Revision, and Navigation Menu.
But , what if we need other post types apart from these default ones, then we have to create the custom post types, it looks the same as your post and pages are showing in your admin panel.
It’s very beneficial for categorising your blogs if there is any specific kind of blog post you have for which you want another type of post type.
How to create custom post types: Now we know what the custom post types are, now we further move to how we can create the custom post type .
There are two ways to create custom post types :
- With your active theme’s functions.php.
- By creating a custom plugin.
For both of the conditions the coding method and procedure are the same so today we are talking only about creating a custom post type for how to create a plugin we can discuss later. But for overview of custom post type by plugin you just need to apply the below procedure under your plugin file. We assume today we are creating the theme’s functions.php.
With your active theme’s functions.php: Here are the following points which we have to follow:
- Hope you already know about which theme is your active in which you are working and if not go to Appearance->Themes, here you can easily see which is your active theme.
- Now go to your wordpress directory wp-content->Themes->Your Active Theme’s Folder.
- Here you can see the file, functions.php, this is the file where you have to put your code for the custom post types creation.
In this file you have to create the function for creating your custom post type and in that function you have to call the built-in function of wordpress which is “register_post_type”.
- In this function you have to pass your post_type_name , labels and arguments.
*You have to put labels and arguments into the form of an array. Here is the example of the function of creating the custom post types:
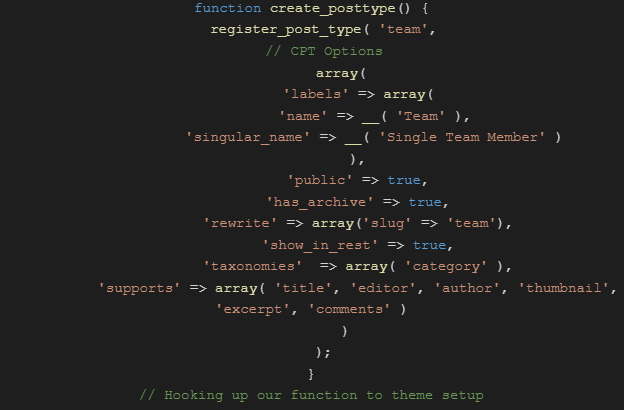
Suppose we have to create a custom post types named : books
/**
 * Register a custom post type called "book".
 *
 * @see get_post_type_labels() for label keys.
 */
function new_book_init() {
    $labels = array(
        'name'              	=> _x( 'Books', 'Post type general name', 'textdomain' ),
        'singular_name'     	=> _x( 'Book', 'Post type singular name', 'textdomain' ),
        'menu_name'         	=> _x( 'Books', 'Admin Menu text', 'textdomain' ),
        'name_admin_bar'    	=> _x( 'Book', 'Add New on Toolbar', 'textdomain' ),
        'add_new'           	=> __( 'Add New', 'textdomain' ),
        'add_new_item'      	=> __( 'Add New Book', 'textdomain' ),
        'new_item'          	=> __( 'New Book', 'textdomain' ),
        'edit_item'         	=> __( 'Edit Book', 'textdomain' ),
        'view_item'         	=> __( 'View Book', 'textdomain' ),
        'all_items'         	=> __( 'All Books', 'textdomain' ),
        'search_items'      	=> __( 'Search Books', 'textdomain' ),
        'parent_item_colon' 	=> __( 'Parent Books:', 'textdomain' ),
        'not_found'         	=> __( 'No books found.', 'textdomain' ),
        'not_found_in_trash'	=> __( 'No books found in Trash.', 'textdomain' ),
        'featured_image'    	=> _x( 'Book Cover Image', 'Overrides the “Featured Image” phrase for this post type. Added in 4.3', 'textdomain' ),
        'set_featured_image'	=> _x( 'Set cover image', 'Overrides the “Set featured image” phrase for this post type. Added in 4.3', 'textdomain' ),
        'remove_featured_image' => _x( 'Remove cover image', 'Overrides the “Remove featured image” phrase for this post type. Added in 4.3', 'textdomain' ),
        'use_featured_image'	=> _x( 'Use as cover image', 'Overrides the “Use as featured image” phrase for this post type. Added in 4.3', 'textdomain' ),
        'archives'          	=> _x( 'Book archives', 'The post type archive label used in nav menus. Default “Post Archives”. Added in 4.4', 'textdomain' ),
        'insert_into_item'  	=> _x( 'Insert into book', 'Overrides the “Insert into post”/”Insert into page” phrase (used when inserting media into a post). Added in 4.4', 'textdomain' ),
        'uploaded_to_this_item' => _x( 'Uploaded to this book', 'Overrides the “Uploaded to this post”/”Uploaded to this page” phrase (used when viewing media attached to a post). Added in 4.4', 'textdomain' ),
        'filter_items_list' 	=> _x( 'Filter books list', 'Screen reader text for the filter links heading on the post type listing screen. Default “Filter posts list”/”Filter pages list”. Added in 4.4', 'textdomain' ),
        'items_list_navigation' => _x( 'Books list navigation', 'Screen reader text for the pagination heading on the post type listing screen. Default “Posts list navigation”/”Pages list navigation”. Added in 4.4', 'textdomain' ),
        'items_list'        	=> _x( 'Books list', 'Screen reader text for the items list heading on the post type listing screen. Default “Posts list”/”Pages list”. Added in 4.4', 'textdomain' ),
    );

    $args = array(
        'labels'         	=> $labels,
        'public'         	=> true,
        'publicly_queryable' => true,
        'show_ui'        	=> true,
        'show_in_menu'   	=> true,
        'query_var'      	=> true,
        'rewrite'        	=> array( 'slug' => 'book' ),
        'capability_type'	=> 'post',
        'has_archive'    	=> true,
        'hierarchical'   	=> false,
        'menu_position'  	=> null,
        'supports'       	=> array( 'title', 'editor', 'author', 'thumbnail', 'excerpt', 'comments' ),
    );

    register_post_type( 'book', $args );
}

add_action( 'init', 'new_book_init' );
So , the above example we get from the codex.wordpress.org , the wordpress’s official website.
Don’t be scared by seeing the much longer code , that above code is showing just the maximum possibilities of the arguments which we can use in our custom post type creation.
We can clearly see on above code the main function register_post_type needs only :
(i) Custom post type name which we have to register.
(ii) And arguments, which decide what are the things we need in our custom post admin panel, what should be things which we are putting in our custom post , what should be their labels , we can do this by passing an array of labels and arguments.
Most of the arguments are understandable by its name only you can see above. I don’t think it would need to be explained but I will give you an overview about it by that you can easily understand.
Labels – The first one is “labels”. Labels are those kinds of arguments which we can see on the admin panel when we add , edit or delete the post types , then what should be text over there , that all can be decided by the labels, no need to explain more on this you can easily understand it by the above code given.
Arguments other than labels which define under “$args” variable are as follows:
- Public – If it’s true it decides whether you want to show your posts to others or not.
- Supports – This parameter decides what are the things which you want to add your admin panel when you edit the single custom post type, like,
- title – The “title” parameter displays the box for entering the title of your single post which you are adding or editing.
- editor- By this parameter you can create the editor box for post content
- author- This parameter shows the author name with your post type.
- thumbnail- This parameter provides a featured image to your cpt.
- excerpt- This parameter adds a box to adding excerpts for your single post.
- comments- By using this parameter you can allow others to comment on your posts.
Other arguments you can easily understand by it’s name only its only for what kind of permission do you want to provide to your custom post type or not like, it should be publicly accessible or not , it should be rewritable or not, it should has archive or not, and supports arguments I already explain to you on the above.
After defining the labels and arguments you have to call the register_post_type function which actually creates your custom post type , this is also a in built function in wordpress , in this you have to call two parameters, first is the post type name which you are actually registering , name should be specific because whenever you use to call your custom post you have to use this name into the query, and second is your arguments , you can wrap the arguments in some variable as you can see above I use “$args” for this, or if you have passed minimum arguments then you can call directly like shown below:

In the above code you can see how we can directly post the arguments unlike previous code in the register_post_type function.
After definig all the arguments including labels we have to close the array and function our custom post type function code is ready now, if we arap our arguments in variable like $args then we have to call this variable other than the arguments as we see previous to previous code, like we call the $labels on above code.
After calling the register_post_type function and passing the needed parameter in it we have close the function and call the action hook named add_action it has minimal two parameters first is action which we are performing called hook name in our case we using “init” which runs after the wordpress is loading bur before the headers are already sent, Aand second one is our function name, which we are created for creating the custom post type.
Now, we are done, the same method you have to use when you are creating a custom post type by plugin just create your plugin first file as wordpress standard and apply this method over there and activate the plugin and you are done.
Now you can see your custom post type on your admin panel left hand side.
How to query or display your custom post type in wordpress page or post template
After the creation there is one question that arises in our mind: how can we display our newly created post type to our site pages , so the answer of this question is you have to query your custom post type.
For this you have to write the query for displaying your custom post type, there are multiple inbuilt functions are in wordpress for querying the post types, but most popular two functions are in these days :
- get_posts
- query_post
- get_posts – In this method you have to call the arguments in the array even you can wrap the arguments in to some variable and call it under the get_posts in this function the arguments are basically the information of about which post type do you want to query and how many posts of that post type can be shown at a time , if you want particular posts from some specific category you have to mention that on the arguments. Here is the example of get_posts you can see:
    $args = array(
	'numberposts'	=> 20,
	'category'		=> 4
);
$my_posts = get_posts( $args );

if( ! empty( $my_posts ) ){
	$output = '<ul>';
	foreach ( $my_posts as $p ){
		$output .= '<li><a href="' . get_permalink( $p->ID ) . '">'
		. $p->post_title . '</a></li>';
	}
	$output .= '<ul>';
}
In the above example you can easily see how the get_posts works, we wrapped the arguments into the “$args” variable, and after that we call the “foreach” loop we can also use the while loop for this. In the get_posts or any other method for querying the custom post type you can send multiple kinds of arguments for categorizing your posts which you want to get by query.
I am mentioning some of the arguments which can help us to categorising your posts, you have to pass these arguments under
the arguments:
1) numberposts – “numberposts” in the above code you can see this argument , how it would be called , it decides how many posts do you want to at a time , it also helps to create pagination for your custom post type. You can also use this arguments in the other format like this:
“posts_per_page” => 5,
2) category- “category” this arguments is use if you want to get posts from the specific category , if you categorised your posts and want the specific category posts should only be displayed , then you have to pass the category id in to this parameter, And if you want more than one category then put it by the comma separated format like this:
“category” => 2,3,5,
3) post_type- This is one of the important parameters which decides which kind of post type you want to display as we are currently talking about the custom post types so we have to put that name by which we are registering our post types. As the above example we are creating the custom post type named “book” , so if we want to querying this post type we have to mention that name in this parameter like this:
“post_type” => “book”
4) order_by- This filter help us to organising our post to some specific format like if we want our post to order by date, or any specific kind of alphabetical order we use this parameter to organising our posts:
“Order_by” => “date”
5) Include- It is used for retrieving the post id’s which you want to include . If you want more than one post you have to put them into an array.
6) exclude- As the name suggests it is totally opposite to exclude those post ids which are the array of post ids you mentioned.
7) meta_key- Retrieving those posts which have some specific meta_key, if you are adding some custom meta fields by acf plugin or by custom meta box and you want only those posts which have that particular field , only that time we will use this parameter. In this parameter we just only have to pass the meta_key value.
8) meta_value- If we want to retrieve those posts which not only have some specific meta_key as well as some specific value of that particular meta_key then we will use this parameter.
9) offset- If we want to display all posts of our defined query but want to leave some of them from the starting posts then we are using this parameter.
So, these above are some of the parameters or filters by which you can retrieve only specific posts which you want to display , I think by these parameters you can get exactly those posts which you want to display.
query_posts- This is another method for querying the post types , it is introduced by the recent latest version of wordpress. In this method the parameters are same as I described above but the process of calling the the parameters are different you can see it by the below example
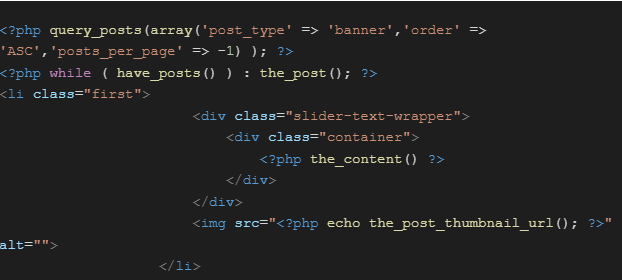

So, you can easily see in the above example that we use the parameters in the query_post function , and after that we are using the loop.
There are multiple ways available in wordpress to query the custom post type. I have explained two of them above here.
So , till now we can understand how we can create the custom post types and how we can display those post types by query and design them accordingly as you can see in the above example.
But here is question arises how can we call the different element or part of the post in our query like title , thumbnail , content , excerpt , so for this we are using some functions which we have to call in the query loop of custom post type and we can use html tags and other styling methods accordingly.
- the_title() – This is the built-in function of wordpress , it is used for calling the post title in the loop.
- the_content()- This function is used for displaying the content of the post.
- the_post_thumbnail()- This function is used for calling thumbnail images from custom posts.
- get_the_post_thumbnail_url()- This function is used for getting the thumbnail url. We can also use the_post_thumbnail_url() for calling the url of post thumbnail.
- the_excerpt()- This function is used for calling the excerpt of the post.
- get_the_author() & get_the_author_meta() – This function is used for displaying the post’s author details in the query. Second function for author meta details.
The Loop- The while loop is used for displaying the custom post type whatever custom post type element we call we have to call under the while loop.
If you want to display your posts in some structured format in a particular template just write the query in that specific post or page template. So, finally we understand how to create custom post types and how to query them for displaying in our wordpress posts and pages.